Released in 1983, the Nintendo Entertainment System (NES) home console was a cheap, yet capable machine that went on to achieve tremendous success. Using a custom designed Picture Processing Unit (PPU) for graphics, the system could produce visuals that were quite impressive at the time, and still hold up fairly well if viewed in the proper context. Of utmost importance was memory efficiency, creating graphics using as few bytes as possible. At the same time, however, the NES provided developers with powerful, easy to use features that helped set it apart from older home consoles. Understanding how NES graphics are made creates an appreciation for the technical prowess of the system, and provides contrast against how easy modern day game makers have it with today’s machines.
The background graphics of the NES are built from four separate components, that when combined together produce the image you see on screen. Each component handles a separate aspect; color, position, raw pixel art, etc. This may seem overly complex and cumbersome, but it ends up being much more memory efficient, and also enables simple effects with very little code. If you want to understand NES graphics, knowing these four components is key.
This document assumes some familiarity with computer math, in particular the fact that 8 bits = 1 byte, 8 bits can represent 256 values, and how hexadecimal notation works. However, even those without a technical background can hopefully find it interesting.
OVERVIEW

Here is an image from the opening scene of Castlevania (1986), of the gates leading to the titular castle. This image is 256×240 pixels, and uses 10 different colors. To represent this image in memory we’d want to take advantage of this limited color palette, and save space by only storing the minimum amount of information. One naive approach could be using an indexed palette, with 4 bits for every pixel, fitting 2 pixels per byte. This requires 256*240/2 = 30720 bytes, but as you’ll soon see, the NES does much a better job.
Central to the topic of NES graphics are tiles and blocks [1]. A tile is an 8×8 region, while a block is 16×16, and each aligns to a grid of the same size. Once these grids are added, you may begin to see some of the underlying structure in the graphics. Here is the castle entrance with grid at x2 zoom.
![]()
![]()
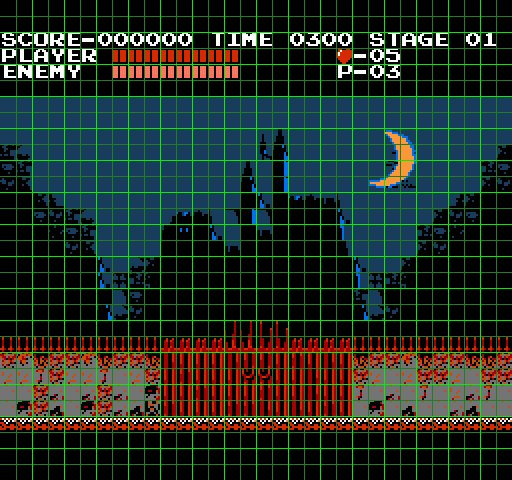
This grid uses light green for blocks and dark green for tiles. The rulers along the axis have hexadecimal values that can be added together to find position; for example the heart in the status bar is at $15+$60 = $75, which is 117 in decimal. Each screen has 16×15 blocks (240) and 32×30 tiles (960). Let’s dive into how this image is represented, starting with the raw pixel art.
CHR
CHR represents raw pixel art, without color or position, and is defined in terms of tiles. An entire memory page contains 256 tiles of CHR, and each tile has 2 bit depth. Here’s the heart:
![]()
And its CHR representation [2]:
![]()
This representation takes 2 bits per pixel, so at a size of 8×8, that means 8*8*2 = 128 bits = 16 bytes. An entire page then takes 16*256 = 4096 bytes. Here’s all the CHR used by the castlevania image.
Recall that it takes 960 tiles to fill an image, but CHR only allows for 256. This means most of the tiles are repeated, on average 3.75 times, but more often than not a tiny number are used as the majority (such as a blank background, solid colors, or regular patterns). The castlevania image uses a lot of blank tiles, as well as solid blues. To see how tiles are assigned, we use nametables.
NAMETABLE
A nametable assigns a CHR tile to each position of the screen, of which there are 960. Each position uses a single byte, so the entire nametable takes up 960 bytes. The order of assignment is each row from left to right, top to bottom, and matches the calculated position found by adding the values from the rulers. So the upper-left-most position is $0, to the right of that is $1, and below it is $20.
The values for the nametable depend upon the order in which the CHR is filled. Here’s one possibility [3]:
![]()
![]()
In this instance, the heart (at position $75) has a value of $13.
Next, in order to add color, we need to select a palette.
PALETTE
The NES has a system palette of 64 colors [4], and from that you choose the palettes that are used for rendering. Each palette is 3 unique colors, plus the shared background color. An image has a maximum of 4 palettes, which takes up 16 bytes. Here is the palette for the Castlevania image:
![]()
Palettes cannot be used with complete abandon. Rather, only a single one may be used per block. This is what typically gives a very “blocky” appearance to NES games, the need to separate each 16×16 region by color palette. Skillfully made graphics, such as this Castlevania intro, avoid this by blending shared colors at block edges, removing the appearance of the grid.
Choosing which palette is used for each block is done using attributes, the final component.
ATTRIBUTES
Atributes are 2 bits for each block, and specify which of the 4 palettes to use. Here’s a picture showing which blocks uses which palette via its attributes: [5]
![]()
![]()
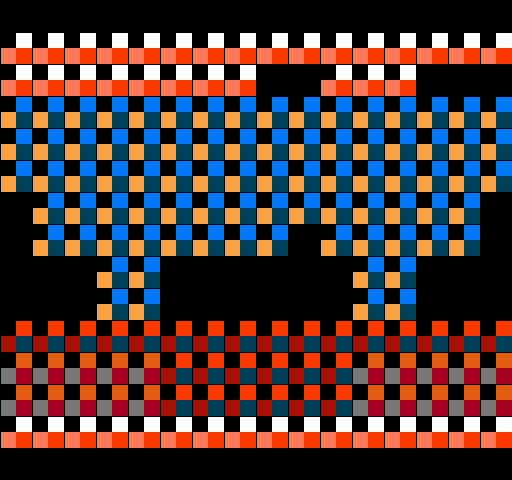
As you may notice, the palettes are isolated into sections, but this fact is cleverly hidden by sharing colors between different areas. The reds in the middle part of the gate blend into the surrounding walls, and the black background blurs the line between the castle and the gate.
At only 2 bits per block, or 4 blocks per byte, the attributes for an image use 240/4=60 bytes, though due to how they’re encoded they waste 4 bytes, using a total of 64. This means the total image, including the CHR, nametable, palette, and attributes, require 4096+960+16+64 = 5136 bytes, far better than the 30720 discussed above.
MAKECHR
Creating these four components for NES graphics is more complicated than typical bitmap APIs, but tools can help. Original NES developers probably had some sort of toolchains, but whatever they were, they have been lost to history. Nowadays, developers will typically create their own programs for converting graphics to what the NES needs.
The images in this post were all created using makechr, a rewrite of the tool used to make Star Versus. It is a command-line tool designed for automated builds, and focuses on speed, good error messages, portability, and clarity. It also creates interesting visualizations such as those shown here.
REFERENCES
Most of my knowledge of how to program the NES, especially how to create graphics, was acquired by following these guides:
FOOTNOTES
[1] Terminology – Some documents refer to blocks as “meta-tiles”, which personally I find less useful.
[2] CHR encoding – The 2 bits per pixel are not stored adjacently. Rather, the full image is stored with just the low bits, then stored again with just the high bits.
So the heart would be stored like this:
![]()
![]()
Each row is one byte. So 01100110 is $66, 01111111 is $7f. In total, the bytes for the heart are:
$66 $7f $ff $ff $ff $7e $3c $18 $66 $5f $bf $bf $ff $7e $3c $18
[3] Nametable – This is not how the actual in-game graphics use the nametable. Typically, the alphabet will appear adjacently in memory, as is the case for how Castlevania really does it.
[4] System palette – The NES does not use an RGB palette, and the actual colors it renders may vary from tv to tv. Emulators tend to use completely different RGB palettes. The colors in this document match the hard-coded palette of makechr.
[5] Attribute encoding – Attributes are stored in a strange order. Instead of going left to right, up to down, a 2×2 section of blocks will be encoded in a single byte, in a Z shaped ordering. This is the reason why there are 4 wasted bytes; the bottom row takes a full 8 bytes.

For example, the block at $308 is stored with $30a, $348, and $34a. Their palette values are 1, 2, 3, and 3, and are stored in low position to high position, or 11 :: 11 :: 10 :: 01 = 11111001. Therefore, the byte value for these attributes is $f9.
4 years earlier Mattel had something similar in the Intellivision (but simpler obviously): http://wiki.intellivision.us/index.php?title=STIC
Thanks for this article. I really look forward to more NES related articles. I am trying to teach myself how to make an NES game and this helps.
Great article, thanks for sharing!! Looking forward to part 2
Great article! Very well written!
Cool article, I read this now and I am going to rest the others now. Happy Christmas man
>”An image has a maximum of 4 palettes, which takes up 16 bytes.”
I think you meant to say background instead of image here.