Part 1 discussed the components of NES background graphics – chr, nametable, palettes, and attributes. But this was only half of the story.
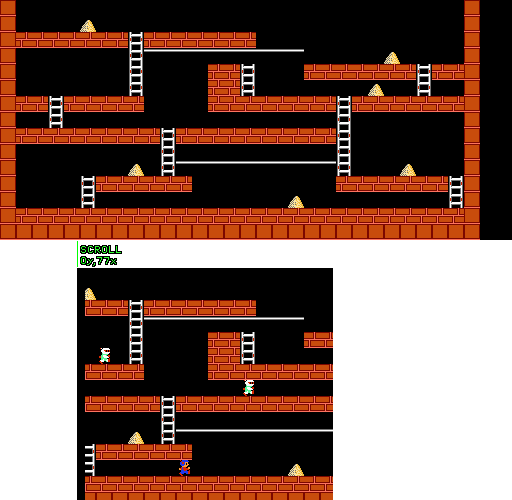
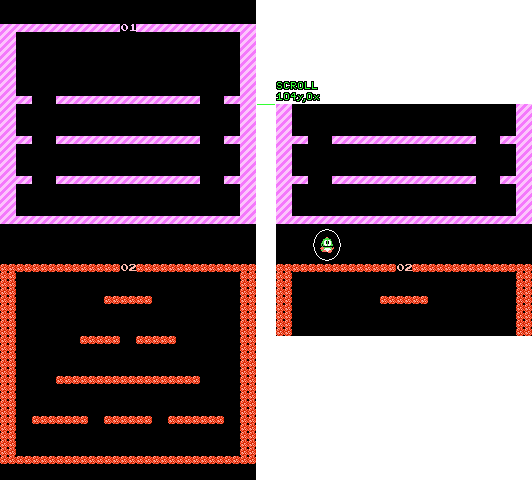
For starters, there are actually two nametables [1]. They each have their own attributes for determining color, though they share the same chr. Cartridge hardware determines their position, either side-by-side or stacked on top. Shown here are examples of games using each orientation, Lode Runner (1984) and Bubble Bobble (1988).
SCROLLING
To exploit having two nametables, the PPU supports pixel-at-a-time scrolling in both the X and Y dimensions. It’s controlled using a memory-mapped register at address $2005, meaning that writing just two bytes to this location moves the entire screen as many pixels as needed [2]. When the NES premiered, this was a major advantage over other home consoles, which often required rewriting the entire video memory for scrolling. This easy to use facility led to a proliferation of action platformers and shooters, and was a major reason the system was so successful.
For a simple game whose playfield is only two screens wide, like Load Runner, all that’s needed is to fill both nametables, and adjust the scroll as needed. But most scrolling games instead have levels with an arbitrary width. To implement these, the game needs to update the off-screen portion of the nametables before it scrolls into view. The scrolling value wraps around, but as the nametable is continuously updated, it gives the illusion of infinite size.
SPRITES
Aside from scrolling across nametables, there’s a whole other side to NES graphics: sprites. As opposed to nametables, which need to be aligned to grids, sprites can be arbitrarily positioned, making them useful for representing player characters, obstacles, projectiles, or anything with complex movement. For example, in the above scene from Mega Man (1987) the player character, score, and life bar all use sprites, allowing them to break from the nametable grid as the screen scrolls.
Sprites have their own chr page [3] and set of 4 palettes. Additionally, they occupy a 256-byte page of memory that lists each sprite’s position and appearance (turns out, the NES’s video memory is slightly more than double of what was implied in Part 1). The format of these entries is a bit unusual, containing first the Y position, then tile number, then attribute, then X position [4]. Since each entry takes 4 bytes, there is a hard limit of 256 / 4 = 64 sprites on screen at a time.
The Y and X bytes are the upper-left most pixel of the rendered sprite. As a result, a sprite can be clipped off of the right side of the screen, but will leave an empty gap on the left. The tile byte is similar to the value in a nametable, except that sprites use their own chr for tile data. The attribute byte is a pack of bits that serve three purposes: two bits for the palette, two bits to flip a sprite horizontally or vertically, and one bit to render the sprite behind nametables [5].
LIMITATIONS
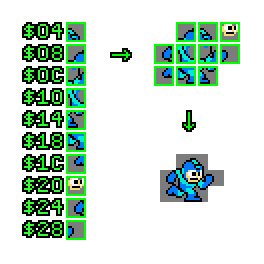
Whereas modern systems allow sprites of arbitrary sizes, on the NES a sprite must be 8×8 [6], due to the constraints of chr. Larger objects are made up of multiple sprites, and software has to ensure the individual pieces are rendered next to each other. For example, the Megaman character is made up of 10 sprites, which also allows for more colors to be used, specifically his white eyes and skin tone.
A major restriction that comes with using sprites is the 8-per-scanline restriction. For any given horizontal line of the screen, if more than 8 sprites appear, those that appear later in memory simply won’t be rendered. This is the cause of flickering in sprite heavy games; software will rotate the addresses of sprites in memory, so that each renders at least part of the time.
Finally, scrolling does not interact with sprites; a sprite’s position on screen is determined by it’s Y and X values, regardless of what the scroll position is. Sometimes this is an advantage, when the level moves around the player or a HUD stays in a fixed position. Other times, though, it is a disadvantage, where a moving object needs to be repositioned and then adjusted by how much the scroll has changed.
FOOTNOTES
[1] Technically speaking, there are actually 4 nametables, but they are mirrored such that only 2 contain unique graphics. Side-by-side is called vertical mirroring, whereas stacked is called horizontal mirroring.
[2] There is also a register that chooses which nametable to start rendering from, so the scroll is actually a 10-bit value, or 9-bit if we take mirroring into account.
[3] This is not necessarily true. The PPU can be configured at will to use the same chr page for nametables as sprites.
[4] This order might be used because it matches the data the PPU has to care about in order to render efficiently.
[5] This bit is used for various effects, for example, to move Mario behind white blocks in Super Mario Bros 3, or to render fog on top of sprites in Castlevania 3.
[6] The PPU also has an option to enable 8×16 sprites, used in games such as Contra that have tall characters. Even still, all other restrictions still apply.
I used to work with the NES hardware and understand it fairly well. I still enjoy reading these articles.
I love these articles! Please keep making them! Growing up with a NES/SNES this is very interesting! I always wondered about those flickering sprites, but now I know and have to tell all my friends!
Pingback: 3DNes and how Nintendo could have improved upon NES titles for 3DS on the virtual store – Reuel's