Part 1 and part 2 described CHR data, nametable based backgrounds, sprites, and scrolling. Combined, these cover nearly everything a basic NES cart can do without using additional hardware. To go any further will require a quick tangent to discuss, in detail, how rendering happens.
RENDERING

Scanline based rendering, with a pause for vblank
Like any older computer, the NES was designed to work with CRT TVs. They draw scanlines to the screen, one at a time, left to right, top to bottom, using an electron gun that physically moves to point at the screen where it draws these lines. Once the bottom corner is reached, a period called “vertical blank” (or vblank) happens, wherein the electron gun moves back to the top left to prepare to draw the next frame. On the NES, the PPU (Picture Processing Unit) does this scanline based rendering automatically, every frame, while code running in the CPU does whatever work the game needs to do. Vblank gives the software an opportunity to change data in the PPU’s memory, as otherwise that memory is being used for rendering. Most of the time, changes to the PPU’s nametable and palettes have to occur during this small window.
However, certain changes to the PPU’s state can be performed while the screen is being rendered, these are called “raster effects”. Most commonly, the scroll position can be assigned midscreen, creating one portion that stays static (like a HUD), while the rest scrolls ahead. Achieving this effect requires precisely timing when to change the scroll, so that it happens at the desired scanline. There are a number of techniques to perform this kind of synchronization between game code and the PPU.
SCREEN SPLITS
HUD on top doesn’t move as the level scrolls
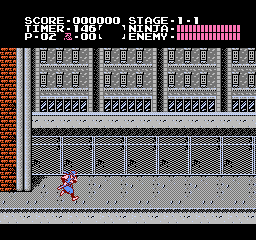
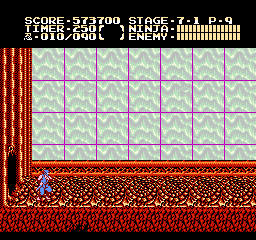
First, the PPU has built-in hardware that treats the sprite at memory position zero specially. Whenever this sprite is rendered, if one of its pixels overlaps a visible part of the background, a bit called the “sprite0 flag” is set. Game code can first position this sprite where it wants a split to occur, then wait in a loop, checking for the sprite0 flag, so when this loop exits it knows exactly which scanline is currently being rendered. This is used by many NES games to make a simple screen split, like Ninja Gaiden (1989) shown here [1].

Sprite0 is at Y $26, and X $a0. When its bottom row of pixels is rendered, the sprite0 flag gets set
Some games combine this sprite0 flag with another technique, that of a predictably timed loop, to wait for a certain number of additional lines to render, thus getting multiple splits on the screen. For example, Ninja Gaiden uses this in many of its cinematics to create dramatic effects, such as a windy grass field, or the sight of a distant castle. The game performs tasks like playing music and waiting for input at the start of the frame being rendered, then uses sprite0 to find the first split, and uses timed loops for the others.
However, most games can’t afford to spend their time waiting in loops, especially during action scenes where CPU time is precious. For these cases, special hardware (called a mapper, because it uses its own memory mapping) is in the carts which can retrieve notifications when a certain scanline occurs [2] removing the need to have wait loops at all. The game code can do whatever task it wants, whenever it wants, resulting in better cpu utilization. Most later games which have a lot of screen splits use mappers this way.
Here is Ninja Gaiden 2 using a mapper to perform multiple splits, imitating parallax scrolling to create a sensation of great speed, even though the level itself is stationary. Notice that all of the different moving sections occupy strict horizontal bands; that is, none of the background layers overlap each other. This is a consequence of the fact that splits are made by changing the scroll at individual scanlines.
BANK SWITCHING
Mappers can perform many other functions, but by far the most common is bank switching. This is when an entire block of address spaces are reassigned to point to a different part of memory [3]. Banking can be done to program code (allowing games to have lots of levels and music), but also with CHR data, instantaneously replacing the tiles that nametables or sprites refer to. Used between frames, this can animate an entire background all at once. But used as a raster effect, this lets different parts of the screen use completely different art. Ninja Gaiden games use this during gameplay, to render the hud separately from the level, and also during cinemas, keeping text and visual scenes in different CHR banks.
An animated background made using bank switching
Repetition in the background, each section of nametable refers to the same pattern of tiles
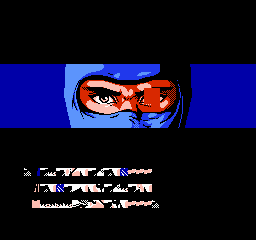
The top half of this cinematic uses one CHR bank. Sprites are used to render the eye, providing more colors
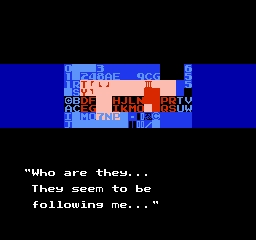
The bottom half uses another CHR bank. The scroll also gets reset when banks are switched
Bank switching can also be used for parallax scrolling, in a limited (albeit still impressive) form. If there’s a section of background made up of a short repetitive pattern, multiple banks can contain that same pattern, offset by a different amount. Then that pattern can be scrolled a certain amount by switching to the bank with the appropriate offset. This can even be used to parallax scroll with an overlapping background, by having tiles that aren’t affected by bank switching [4]. The downside is that a lot of CHR space needs to be used across all banks in total.
Metal Storm (1991) using bank switching for layered scrolling
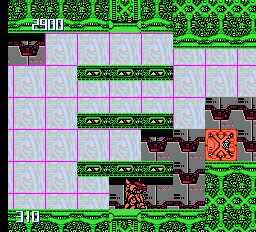
Repetition in the nametable allows for this layered effect
Bank switching CHR is a very powerful tool, but still has limitations. Although it’s useful for animating an entire screen, it isn’t that great at changing a small part of the screen at a time; for that nametable changes are needed. Also, the amount of CHR a cart can have is limited, and data needs to pre-exist before it can be banked to. Finally, aside from scrolling-based raster effects, the strict grid of nametables is always in effect, limiting the dynamic range of graphical effects.
MORE EXAMPLES
Vice: Project Doom (1991) makes this flame effect by continually setting the scroll position at each scanline. The character in front is made using sprites, which aren’t affected by the scroll.
Sword Master (1990) uses bank switching to scroll the distant mountains, and screen splits for the HUD and foreground grass.
ACKNOWLEDGEMENTS
It wouldn’t have been possible to generate these graphics without the powerful debugging features provided by the emulator FCEUX. Also, the nesdev wiki once again was a great resource for understanding how sprite0 works:
FOOTNOTES
[1] The situation for Ninja Gaiden is actually slightly more complicated. It uses 8×16 sprites, a special mode offered by the PPU, which renders sprites as vertically stacked pairs. So sprite0 is fully transparent, and sprite1 has the line of pixels at the bottom. It also sets the z-layer of these sprites so that they are rendered behind the blackness of the HUD, leaving nothing visible.
[2] The way this works is pretty clever. Game code writes a desired scanline to the mapper’s address space. Then the mapper intercepts the PPU’s memory accesses, counting whenever it notes a new scanline is being rendered. When the target scanline is reached, it generates a hardware interrupt (an IRQ), wherein game code runs, doing whatever tasks it wants to do at that scanline.
[3] Banking is accomplished by hardware memory-mapping, intercepting memory accesses and overridding the physical location that gets retrieved. As a result it is instantaneous, but also has high granularity, typically affecting an address range of 4KB or 8KB.
[4] The only way to bank CHR without affecting every tile is to either have tile data duplicated between banks, or have a mapper with a finer granularity. With such a mapper, a smaller part of a bank, perhaps only 1KB at a time, can be banked while the rest stays the same.
Thanks for these series! Would it be possible to do something similar but with Sega Master System? Even in a resumed form, as it shares several details with the NES
Personally, I have zero knowledge of the Master System, whereas I’ve made NES homebrew already. However, it’s definitely something I’m interested in and would like to look into!
The SMS, just like the majority of computer and consoles of the 80s, also has tile/character-based graphic modes, together with horizontal and vertical smooth scrolling.
Nice article !
Just a detail: “an electron gun that physically moves” is not quite right, the electron gun does not move. There are coils around the opening of the electron gun that create a variable magnetic field to deflect electrons in the right direction.
Kirby’s Adventure had a unique use of bankswitching which I thought was cool. It’s actually a very good game and it’s quite impressive because it was released in 1993 so developers had managed to figure out nearly every trick in the book. They used bankswitching to emulate the mosaic effect that the SNES hardware was natively capable of (http://youtube.com/watch?v=znn-w57UAoI).
Such a cool article!! Feels like I lived long enough to see technology do full circle
Awesome series. Very informative and really well written.
I’m curious about how the graphics worked in racing games like Mario Kart, for example. Looking at a screenshot ( http://images.nintendolife.com/screenshots/16705/large.jpg ) it’s hard to see how this could be done. It looks like there are more than 8 sprites per scanline, for one thing. Also, on some levels, the background is layered/composited and different layers move at different speeds, so it wouldn’t be the smooth scrolling trick you mentioned here.
Thanks again for these articles!
Mario Kart is on the Super NES, which has massively expanded capabilities. It no longer has the 8 sprite per scanline limit, and has a special graphics mode called Mode 7 that allows it to scale, stretch, and rotate the background layer. Beyond that, my knowledge of the SNES is pretty limited, but it’s something I plan to learn more about in the future.
Haha, I feel like a fool! Somehow I thought that was NES.
Thanks for the quick reply
It’s okay, we all make mistakes. An earlier commenter even pointed out a mistake I made in this very post. Thanks for the ask!
Thanks for posting. Seeing the Nija Gaiden images brought back some good memories.
I love this blog. Thanks for writing it. The entry on palette usage on the menu in Star Versus remains one of my favorites, as well as this series.